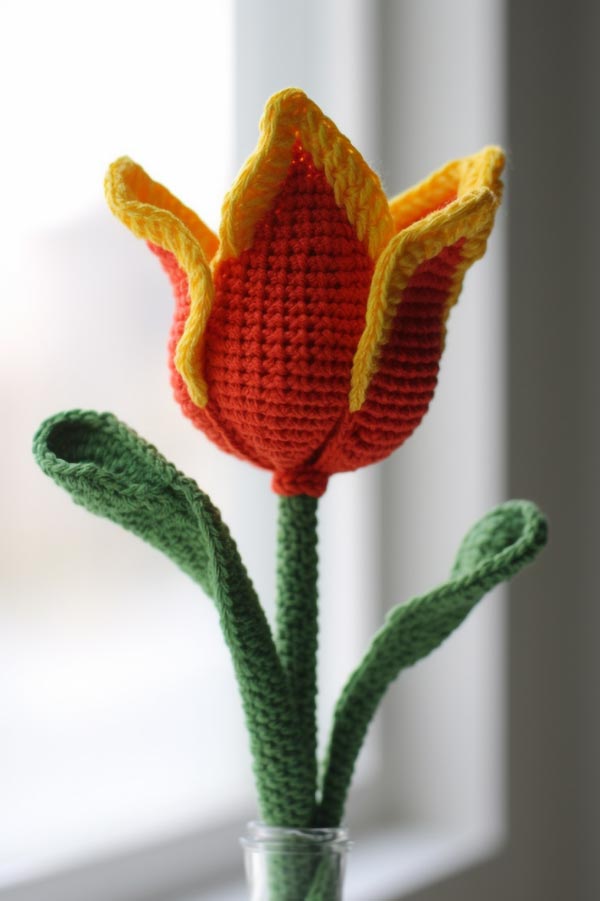
How to Crochet a Tulip. Free Pattern

Crocheting a tulip flower can be a challenging project for those who are new to crocheting. However, with some practice and patience, it can be a very rewarding and satisfying experience. This project can be a great way to showcase your skills as a crocheter and add a beautiful floral touch to your home decor.
One of the things that make the tulip flower project challenging is the intricate details and shaping required to make the flower look realistic.
The petals of the tulip need to be properly formed and spaced apart to give the flower a natural appearance. This can take some time to perfect, but with some practice, you can achieve a beautiful and lifelike tulip.
Another aspect of this project that can be challenging is choosing the right colors. Tulips come in a variety of colors, so you’ll want to pick a color that best suits your taste and décor style.
Reds, pinks, and yellows are popular tulip colors, but you can also experiment with other shades like white, purple, or orange.
It’s important to consider the colors of the yarn you’re using and how they’ll complement each other. You may want to choose a green yarn for the stem and leaves to contrast with the flower color.
When selecting your yarn, it’s also important to choose the right weight. For this project, you’ll want to use a worsted weight yarn to ensure that your tulip flower has enough body and shape. A smaller or larger weight yarn may result in a flower that doesn’t look as realistic or hold its shape well.
Materials needed:
Worsted weight yarn in desired tulip color (such as red or pink)
Green worsted weight yarn for stem and leaves
3.5 mm crochet hook
Fiberfill stuffing
Yarn needle
Scissors
Note: This pattern is worked in continuous rounds. Use a stitch marker to keep track of the first stitch in each round.
Tulip:
Round 1: Using tulip color yarn, make a magic ring and work 6 single crochets into the ring. Join with a slip stitch to the first single crochet. (6 stitches)
Round 2: Chain 1. Work 2 single crochets into each stitch around. Join with a slip stitch to the first single crochet. (12 stitches)
Round 3: Chain 1. Work 1 single crochet in the next stitch, work 2 single crochets in the next stitch. Repeat from * to * around. Join with a slip stitch to the first single crochet. (18 stitches)
Round 4: Chain 1. Work 1 single crochet in each of the next 2 stitches, work 2 single crochets in the next stitch. Repeat from * to * around. Join with a slip stitch to the first single crochet. (24 stitches)
Round 5: Chain 1. *Work 1 single crochet in each of the next 3 stitches, work 2 single crochets in the next stitch*. Repeat from * to * around. Join with a slip stitch to the first single crochet. (30 stitches)
Round 6: Chain 1. Work 1 single crochet in each of the next 4 stitches, work 2 single crochets in the next stitch. Repeat from * to * around. Join with a slip stitch to the first single crochet. (36 stitches)
Round 7: Chain 1. Work 1 single crochet in each of the next 5 stitches, work 2 single crochets in the next stitch. Repeat from * to * around. Join with a slip stitch to the first single crochet. (42 stitches)
Round 8-10: Chain 1. Work 1 single crochet in each stitch around. Join with a slip stitch to the first single crochet. (42 stitches)
Round 11: Chain 1. Work 1 single crochet in each of the next 5 stitches, decrease 1 stitch. Repeat from * to * around. Join with a slip stitch to the first single crochet. (36 stitches)
Round 12: Chain 1. Work 1 single crochet in each of the next 4 stitches, decrease 1 stitch. Repeat from * to * around. Join with a slip stitch to the first single crochet. (30 stitches)
Round 13: Chain 1. Work 1 single crochet in each of the next 3 stitches, decrease 1 stitch. Repeat from * to * around. Join with a slip stitch to the first single crochet. (24 stitches)
Round 14: Chain 1. Work 1 single crochet in each of the next 2 stitches, decrease 1 stitch. Repeat from * to * around. Join with a slip stitch to the first single crochet. (18 stitches)
Round 15: Chain 1. Work 1 single crochet in the next stitch, decrease 1 stitch. Repeat from * to * around. Join with a slip stitch to the first single crochet. (12 stitches)
Round 16: Chain 1. Decrease in each stitch around. Join with a slip stitch to the first single crochet. (6 stitches)
Fasten off and weave in ends. Stuff tulip with fiberfill stuffing before closing the opening.
Stem and leaves:
Row 1: Using green yarn, chain 30. Starting from the second chain from the hook, work 1 single crochet in each chain. Chain 1 and turn. (29 stitches)
Row 2: Work 1 single crochet in each stitch across. Chain 1 and turn.
Row 3: Work 1 single crochet in each stitch across. Chain 15 and turn.
Row 4: Starting from the second chain from the hook, work 1 single crochet in each chain and in each stitch across. Fasten off and weave in ends.
Assembly:
Using the yarn needle, sew the stem and leaves to the bottom of the tulip. Adjust the position of the leaves to your desired shape.
Congratulations! You’ve now crocheted a lovely 15-inch tulip flower. I hope you enjoy making and displaying it.
What is worsted weight yarn?
Worsted weight yarn is a type of yarn that is commonly used in crocheting and knitting. It’s a medium weight yarn that falls in the middle of the yarn weight spectrum, making it versatile and easy to work with. Worsted weight yarn is thicker than a fingering or sport weight yarn, but thinner than a bulky or super bulky weight yarn.
One of the advantages of using worsted weight yarn is that it comes in a wide variety of colors, textures, and fibers, making it easy to find the perfect yarn for your project. It’s also widely available and affordable, making it a great choice for beginner and experienced crocheters alike.
Printable Pattern
How to Crochet a Tulip
Materials
- Worsted weight yarn in desired tulip color (such as red or pink)
- Green worsted weight yarn for stem and leaves
- 3.5 mm crochet hook
- Fiberfill stuffing
- Yarn needle
- Scissors
Instructions
Round 1: Using tulip color yarn, make a magic ring and work 6 single crochets into the ring. Join with a slip stitch to the first single crochet. (6 stitches)
Round 2: Chain 1. Work 2 single crochets into each stitch around. Join with a slip stitch to the first single crochet. (12 stitches)
Round 3: Chain 1. Work 1 single crochet in the next stitch, work 2 single crochets in the next stitch. Repeat from * to * around. Join with a slip stitch to the first single crochet. (18 stitches)
Round 4: Chain 1. Work 1 single crochet in each of the next 2 stitches, work 2 single crochets in the next stitch. Repeat from * to * around. Join with a slip stitch to the first single crochet. (24 stitches)
Round 5: Chain 1. *Work 1 single crochet in each of the next 3 stitches, work 2 single crochets in the next stitch*. Repeat from * to * around. Join with a slip stitch to the first single crochet. (30 stitches)
Round 6: Chain 1. Work 1 single crochet in each of the next 4 stitches, work 2 single crochets in the next stitch. Repeat from * to * around. Join with a slip stitch to the first single crochet. (36 stitches)
Round 7: Chain 1. Work 1 single crochet in each of the next 5 stitches, work 2 single crochets in the next stitch. Repeat from * to * around. Join with a slip stitch to the first single crochet. (42 stitches)
Round 8-10: Chain 1. Work 1 single crochet in each stitch around. Join with a slip stitch to the first single crochet. (42 stitches)
Round 11: Chain 1. Work 1 single crochet in each of the next 5 stitches, decrease 1 stitch. Repeat from * to * around. Join with a slip stitch to the first single crochet. (36 stitches)
Round 12: Chain 1. Work 1 single crochet in each of the next 4 stitches, decrease 1 stitch. Repeat from * to * around. Join with a slip stitch to the first single crochet. (30 stitches)
Round 13: Chain 1. Work 1 single crochet in each of the next 3 stitches, decrease 1 stitch. Repeat from * to * around. Join with a slip stitch to the first single crochet. (24 stitches)
Round 14: Chain 1. Work 1 single crochet in each of the next 2 stitches, decrease 1 stitch. Repeat from * to * around. Join with a slip stitch to the first single crochet. (18 stitches)
Round 15: Chain 1. Work 1 single crochet in the next stitch, decrease 1 stitch. Repeat from * to * around. Join with a slip stitch to the first single crochet. (12 stitches)
Round 16: Chain 1. Decrease in each stitch around. Join with a slip stitch to the first single crochet. (6 stitches)
Fasten off and weave in ends. Stuff tulip with fiberfill stuffing before closing the opening.
Stem and leaves:
Row 1: Using green yarn, chain 30. Starting from the second chain from the hook, work 1 single crochet in each chain. Chain 1 and turn. (29 stitches)
Row 2: Work 1 single crochet in each stitch across. Chain 1 and turn.
Row 3: Work 1 single crochet in each stitch across. Chain 15 and turn.
Row 4: Starting from the second chain from the hook, work 1 single crochet in each chain and in each stitch across. Fasten off and weave in ends.
Assembly:
Using the yarn needle, sew the stem and leaves to the bottom of the tulip. Adjust the position of the leaves to your desired shape.
Notes
This pattern is worked in continuous rounds. Use a stitch marker to keep track of the first stitch in each round.
More interesting articles you may be interested in reading:
Potato Grow Bags: The Key to a Convenient, Pest-free, and Bountiful Harvest
Fluffy Miniature Cows Are SO CUTE and They Make GREAT PETS.
20 Ways to Deter Rabbits from Eating Your Garden
How To Get Rid Of Wasps With Just A Brown Paper Bag
How To Get Rid Of Any Burrowing Animals With This Dawn Soap Solution
Thanks for reading and be sure to share this info with your friends using the social share buttons below.


