DIY Activity Board
DIY Activity Board
My kids are always playing with items around the house that wouldn’t be considered toys. Some of their favorite things are tupperware containers with twist on lids, wheels of a flipped over chair, cabinet doors, and anything with different textures like grass or soft blankets.
So after trying to stop them from getting into my cabinets countless times, I decided they needed something similar to play with. That’s when I created their very own activity board. I’m sure you’ve seen a few around the internet, but for me, I knew that if I gave my children a chance to play with locks, they’d be mini Houdinis. So, my board features safer options, while still keeping them entertained.
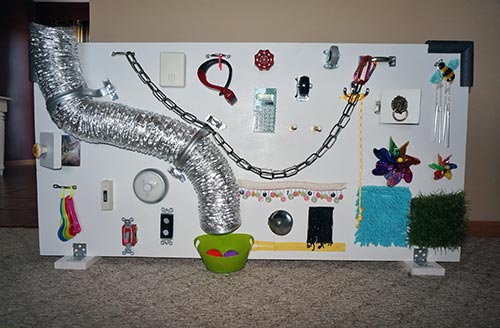
There are doors to open and reveal a picture of their favorite animal (meow!), colors to name, light switches and LED lights to flip, a door bell, wheels to spin, a spigot to turn, different textures and a cute little wind chime. This constantly entertains them and it is fun to sit back and watch them play.
*I will advise that it is absolutely imperative that you maintain constant adult supervision while your children are playing with any DIY activity board, and that it be put out of their reach when they are finished.
Here is how you can create a DIY Activity Board:
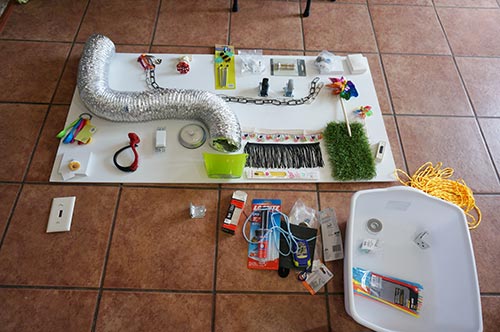
Find your items
I ran around the house first, seeing what things I thought my children would enjoy and how they could interact with it. Then I ran to the dollar store and the local hardware store to get the rest of my items. The board I decided on is thin, so I used extra brackets and created feet for it to stand on. I didn’t use many screws so as to prevent a choking hazard. Instead, I purchased some strong adhesive, but mostly used my trusty hot glue gun for adhering items to the board. This will depend on how aggressive your children get when interacting with the items.
If you’re having trouble finding things, here’s what you could use:
- Pinwheels
- Doorbell
- Doorstops
- Calculator
- Pocket mirror
- LED light
- Dryer vent
- Chain
- Windchime
- Faux Grass
- Mop mitt
- Caster wheel
- Hooks
- Spigot
- Measuring spoons
- Zipties
- Handles
- Light switch
- Decorative tape
Decorate the board
The board I chose was a bit rough, so I sanded it a little and made sure there wasn’t any sharp spots before painting. You can paint it whatever color you think your child would love. You can be really creative with it too by adding their favorite cartoon characters or other painted designs. I’m not much of an artist and I didn’t want the background to be distracting with a pattern or bright color. So I just chose to spray paint it plain white. I also added padded corners for safety. This was pipe insulation foam from the hardware store, but you can also use a pool noodle.

Decorate the board
Place items
I tried to maintain a good flow and rearranged several times before I was happy with the placement of things. Once I was sure of where I wanted each item, I began to secure the items. I must admit, even I had fun interacting with the board!
Place the items
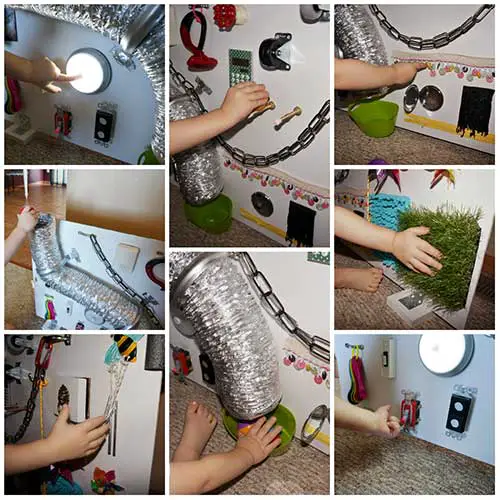
Enjoy their enjoyment
Now watch as they see how the items work and have fun using their imagination. Don’t forget, you can join their play too! Know someone who could use this article? Share on Facebook, pin on Pinterest and if you create one, be sure to send us a photo!
Enjoy their enjoyment
Thanks for reading and be sure to share this info with your friends using the social share buttons below. Talking about social stuff, consider liking our Facebook page to keep up to date with our articles. Check out our other articles for more mental scoops!


No Responses